Publisher Profile Promotional Tab
From Wiki
Contents |
Promotional Tab
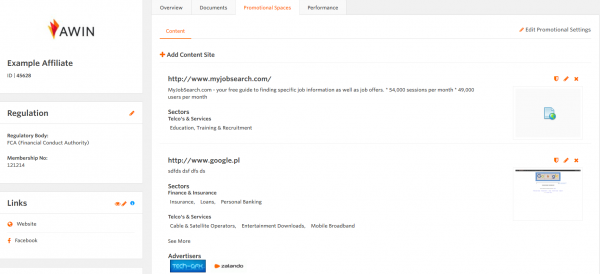
The Awin Interface allows Publishers to include multiple sites in the promotional area of the account. Within the interface you can attribute a vast number of sites to an account to allow Advertisers to see how you work and how they would be promoted if they partner with you. Including accurate information on this page is key to getting Advertisers on-board.
Please see below for an example of the Promotional Tab:
How to Add New Sites
In order to add new sites you will first need to confirm the Promotion Types that you, as an Affiliate, operate under. You can only add new sites under Promotion Types that you have set within your Publisher account.
Including Promotion Types
Navigate to your Promotional Settings area for any given Affiliate account via the Settings icon in the top control box (hover or click). The form you want to edit is the Promotional Type.
You will be faced with a list of the available types. You must select at least one Promotion Type and then one Sub-category under the Promotion Type. You must also indicate (using the radio buttons) which is your Primary Promotion Type.
Adding New Sites
Navigating back to the Profile Page and then onto the Sites tab you will now see that the Promotion Types that you selected appear in a grey bar under your available tabs. Select the relevant type that you wish to include a site under and you will have the option to add a new site. This will now open a new area that allows you to input the relevant information so that Advertisers can easily access your business. The mandatory fields here are the Site URL, the Site Description and a minimum of one Advertiser and one sector. You can add a maximum of three Advertisers and three sectors.
Once this information is complete and has been validated you will notice a screenshot icon pop up to the left of the data that you input. This is grabbing a preview of the homepage from the URL given.
Editing an Existing Site Entry
Once you have created an entry you will notice that you have an edit icon (the pencil) located to the right. Clicking this will open the corresponding entry and allow you to edit the details.
Deleting an Existing Site Entry
Once you have created an entry you will notice that you have a red cross located to the right. Clicking this will remove the corresponding entry and data from your Profile Page.
Site Verification
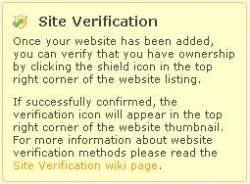
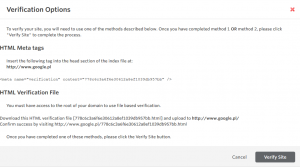
Verifying your site is possible once you have successfully added a site to your Promotional Types. You will see the new site listed under the relevant promotional tab. In the top right hand corner of each list item you will find a shield icon. If you click this, you open the verification window.
From here you have a 'Primary' and an 'Alternative' method of verification:
1. Verify By Meta Tag - Primary Method
In the window you can find the meta tag code snippet that our system will look for in order to verify your site. All you have to do is copy and paste this snippet into the head section of the index file at the url you're verifying.
2. Verify by HTML file - Alternative Method
The second method simply requires you to create a html page with the file name provided for you in the verification window. This file needs to be added to the root directory of your website.
Please note: This method is only suitable for Publishers who have access to the root directory of their site. It will not work with subdirectories or sub-domains.
Once you have done this, click the verify site button and your site will be verified.


