How to create a commission group
From Wiki
HOW TO CREATE A COMMISSION GROUP
The Commission group functionality within the interface enables advertisers to set up percentage based or flat rates commissions for specific product ranges in relation to the products sold on their websites.
Commission groups are used to further entice publishers to promote certain products from the advertiser’s websites,
For Example: A percentage based commission group could be set up to pay publishers 10% of the sale amount for every DVD that is purchased from their site.
There are also Tier based commissions which correspond to the amount of products promoted and purchased through specific publishers. These tiers again can be based on percentage or flat rates and can continually increase throughout the life of a program.
It is required that one commission group is set up as a minimum for each advertiser account as it is important publishers receive commission on all products. If commissions are not defined the default is set in place at a 1% commission for all products purchased.
The commission group performance reports show how each commission group is performing over a certain period of time, which commission groups have been the most effective and which publishers are linked to each group.
The use of commission groups is steadily increasing throughout advertiser programs with the addition of adding ‘new’ and ‘existing’ user commission groups.
For more information on the reporting side of commission groups please see here
There are several types of commission groups that are possible to set up through your account:
- A percentage of the sale amount is paid to publishers.
- A flat rate is paid to the publishers.
- A lead based commission is set for publishers.
- A tier based commission is set for publishers.
If you are having difficulty setting up commission groups or have any questions, please contact your account manager.
Creating Commission Groups
How to add commission groups video guide and for other tutorials click here.
STEP BY STEP GUIDE
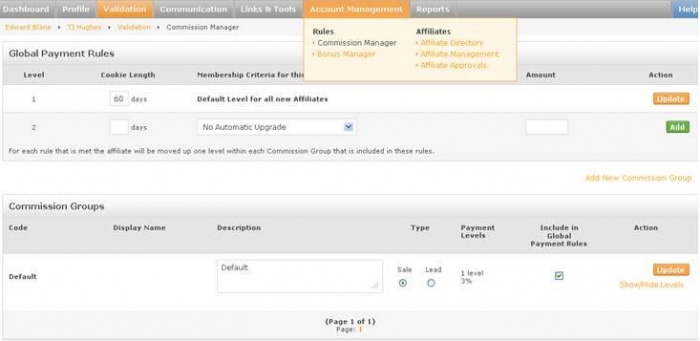
Step 1 - Adding a new commission group: Go into your advertiser account and select the Account Management tab, from here select Commission Manager as shown in the picture below.
This will show all current commission groups set up for this account and the global payment rules that have been set up.
The Global Payment Rules can be set up to increase publisher commissions dependant on number of confirmed sales, value of confirmed sales or value of confirmed commissions of sales.
For example: If your Global Level 2 criteria is 20 sales and your Level 2 criteria for this commission group is 4 sales, a publisher will move up to Level 2 within this commission group either by achieving 20 sales in total or by achieving 4 sales within this commission group, within the set cookie length period.
NOTE: Level 1 of the global payment rules is set to a default cookie length of 30 days for all new publishers.
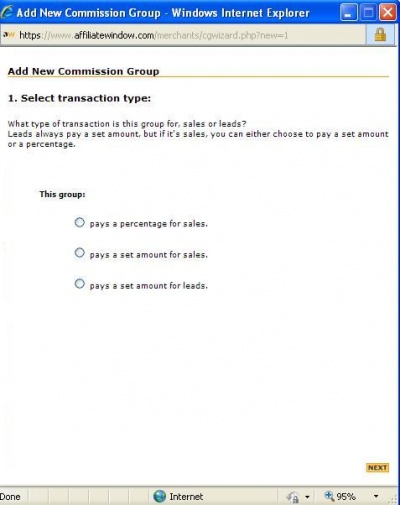
Step 2 - Choosing a type of commission : In order to create a new commission group, click on the Add New Commission Group link on the right of the page.
This will bring up the selection box for you to identify which commission type you are looking to create.
Step 3 - Identifying the commission group: Once you have chosen which type of commission group to set up, please click on the NEXT button in the right bottom corner of the popup.
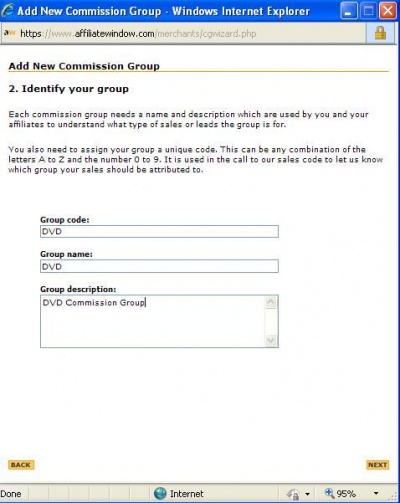
This will bring up the identification menu, where the commission group will need to be named and given a description.
The Group Code is vital for a commission group to work with Awin technology as this will need to match the code being passed through in the tracking on the confirmation page. This will then enable our system to match the commission group to the ones passed through in the tracking code and pay the predefined commissions to the publishers.
The Group Name is used to identify what group this commission belongs too, this if often designated the same as the group code.
The Group Description is used to identify the use of the commission group or to add further notes of relevance to the newly created commission group.
NOTE: At any stage that you wish to go back here you can do so by pressing the BACK button on the left bottom corner of the popup menu.
Step 4 - Setting the commission group criteria Once you have chosen which type of commission group to set up, please click on the NEXT button in the right bottom corner of the popup.
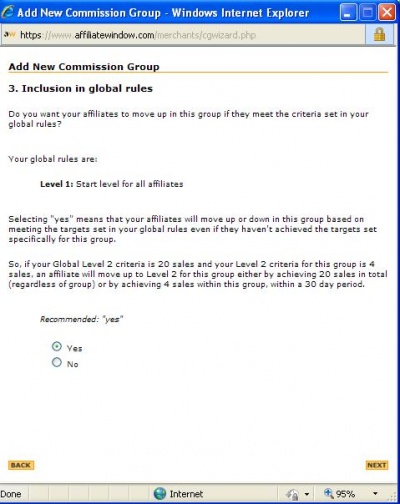
This will bring up the commission group criteria menu which asks if you wish this newly created commission group to follow the current set up of the global payment rules (as explained in step 1). This menu will also show you what rules are currently set up for your acocunt.
NOTE: It is recommended that all new commission groups follow the global payemnt rules as to reduce interferance with other commission groups currently in use. If no rules are set up then please select yes in the menu to ensure smooth activation of this commssion group.
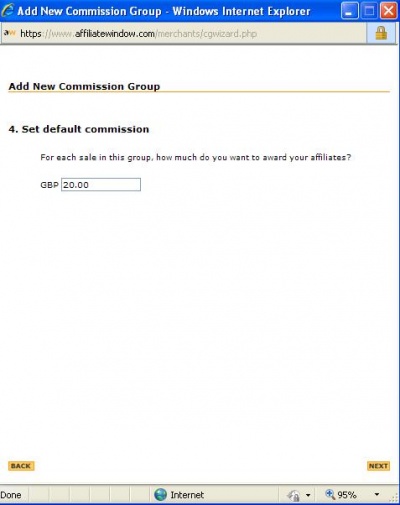
Step 5 - Setting the commission group value Once you have chosen which type of commission group to set up, please click on the NEXT button in the right bottom corner of the popup.
This will bring up the commission value menu and request that you enter an amount or percentage value for this commission group.
In this example the commission is for a flat rate, however this menu will change to which ever type of commission group which was selected in step 2.
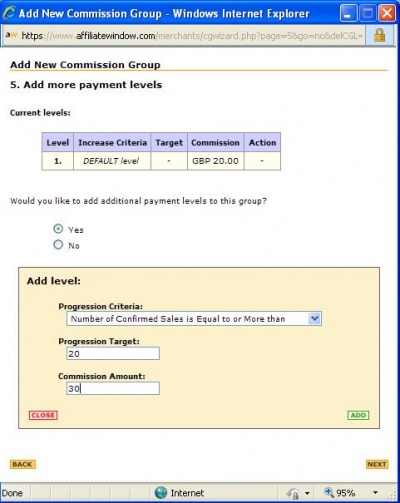
Step 6 - Adding more payment levels Once you have chosen which type of commission group to set up, please click on the NEXT button in the right bottom corner of the popup.
This will bring up the payment level menu which allows you to add extra payment levels for this commission group.
NOTE: If at the commission criteria page, you selected 'Yes' for this commission group to be incluided in the global payment levels, it is advised that you do not create further payment levels for this commission group.
In this example a second payemt level has been created for this commission group, when creating further payment level add the criteria into the progression boxes and click the ADD button.
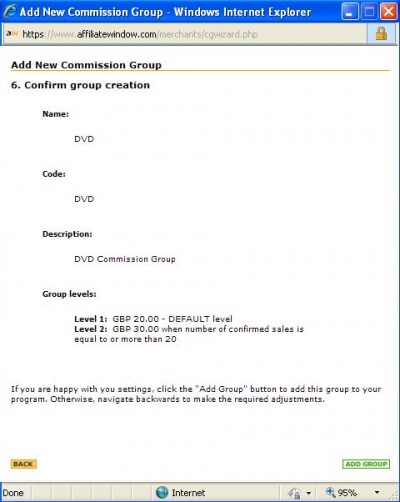
Step 7 - Confirming commission group Once you have chosen which type of commission group to set up, please click on the NEXT button in the right bottom corner of the popup.
This will bring up the final menu confirming all decisions previously made for the creation of this commission group.
If all shows correctly here then please click on the ADD GROUP button in the right bottom corner to complete the creation of this commission group, if not then you can go back to any stage of this process by clicking on the BACK button in the left bottom corner of this menu.
If you are unsure of anything here or have further questions about commission groups please contact your account manager or your technical representative.


