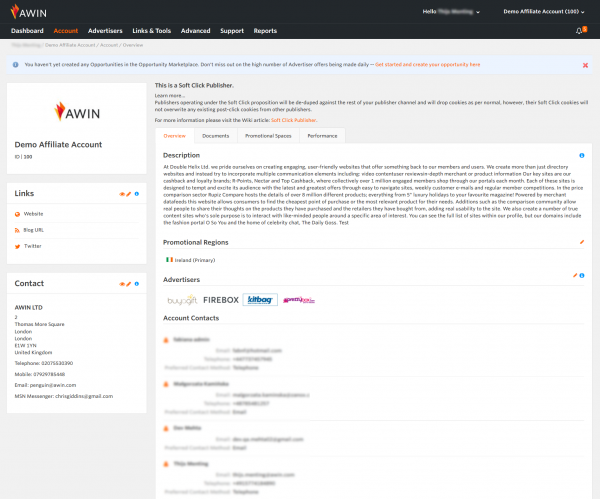
Publisher Profile Overview Tab
From Wiki
Contents |
Overview Tab
The Overview tab is also known as the Profile Page and this is where a Merchant can view a summary of your Affiliate business. This page is made up of a number of editable elements used to promote your business.
Below, you can see an example of a Profile Page:
Profile Picture
This element allows you to upload a picture to associate with your Profile Page. The picture is limited to 168 pixels in width, JPG, GIF or PNG format and no larger than 4MB. Note, this is different to the Account Logo.
Adding a Profile Picture
Navigate to your Profile on the Overview tab. If you roll-over your Profile Picture you will see the Edit option. Click this to open a new modal window where you can click on the Browse button to open a new dialogue window to select the desired image.
Removing a Profile Picture
A picture cannot be removed once added but it can be replaced. To change it simply repeat the above process.
Summary Description
The Summary Description allows you to add a short description about your Publisher business. This is taken automatically from your description in the old interface for legacy purposes but is customisable within Interface.
Editing the Summary Description
This element is actually editable from the Overview tab. If you roll-over the text you'll notice the background will change colour and clicking on this will open an editable text area. This is known as in-line editing and is featured throughout the interface. To complete the action either hit the tick to confirm or the cross to cancel. There is a character limit of 255 and you cannot use HTML.
Contact Details
The contact details display the relevant information for the Owner of the account. This information can be edited or hidden from Users of the profile.
Editing the Contact Details
By hovering over the Settings icon in the control box at the top of the page you will see the settings drop down box appear. From here you can select one of the following depending on what you want to change:
Account Contact:
You have the phone numbers and the primary email address associated with the Publisher account. These can be edited by just changing the values in the form and hitting Update Contact Details.
Address:
To change the address details, along with First Name and Last Name.
NB - Clicking on the Settings icon will take you to the Settings Menu where you can select the same form to edit.
Long description
On the Profile Page you will see a large text area within the main pane of the interface. This is the Long Description and gives you the opportunity to promote yourself and your business in more depth. Use this element to attract the attention of browsing Advertisers in order to tell them of current campaigns that you're running.
Editing the Long Description
This is another in-line editable area and simply clicking on the text will allow you to edit it. This text area is limited to 4000 characters and can include HTML tags to make it more prominent. You can find a list of approved tags below.
Once you are happy that you have edited/updated the description, please use the tick or the cross to save or cancel your changes.
Allowed HTML Tags
- <p> --- Creates a text paragraph
- <h3> to <h6> --- Section headings at different levels, h3 being the highest.
- <ol> --- An ordered (enumerated) list.
- <ul> --- An unordered (bulleted) list.
- <li> --- A list item in ordered (ol) or unordered (ul) lists.
- <blockquote> --- A block-level quotation. The default presentation of block quotations in visual browsers is usually to indent them from both margins.
- <a> --- An anchor can be either the origin or the destination end of a hyperlink (with href it becomes a hyperlink to either another part of the document or another resource).
- <br /> --- A forced line-break.
- <b> --- Sets font to boldface where possible.
- <i> --- Sets font to italic where possible.
- <table> --- Identifies a table.
- <tr> --- Contains a row of cells in a table.
- <th> --- A table header cell; contents are conventionally displayed bold and centered.
- <td> --- A table data cell, column.
Advertisers
Within this element you can promote up to twenty of your favoured Advertisers (that you are joined to) from Awin just to give you a chance to showcase who you work with.
Editing the Advertiser List
In order to change the Advertisers that you promote simply hit the edit link located to the right and this will open a new modal window. This window will be populated by all of the Advertisers that you have an active relationship with. From here, use the check-boxes next to the Advertiser name to select/de-select that Advertiser. Hitting save will save, and instantly update, any changes made.
Account Contacts
The final element located on the Profile Page is the Account Contacts list found under the Advertisers list. This literally just highlights the Users that the account Owner has invited onto the account, such as colleagues.
Showing/Hiding Account Contacts
As an Owner/Admin you can alter the Privacy Settings for the account to show or to hide certain account contacts (Users who have been invited onto the account).
To do this please navigate to the Settings Menu Page by clicking on the cog, in your account switcher, followed by:
Account Permission (under the Permissions/Privacy heading).

